// blog post
Part 3: Configuring OIDC with Pocket ID
This is the part everyone’s been asking about. We’re going to create an OIDC client in Pocket ID, then tell Jellyseerr to use it. The whole thing takes about 5 minutes once you know where the settings are.
Step 1: Create an OIDC client in Pocket ID
Log into your Pocket ID admin panel (e.g., https://auth.yourdomain.com).
- Go to Administration → OIDC Clients
- Click Add to create a new client
- Set the Name to something like
Jellyseerr - Optionally set the Client Launch URL to your Jellyseerr domain (e.g.,
https://requests.yourdomain.com). This just adds a handy link in the Pocket ID dashboard - You can edit the Client ID to something readable like
jellyseerr, or leave the auto-generated one. Either way, copy it because you’ll need it in a moment - Copy the Client Secret - you’ll need this too. You can only see it once, so don’t skip this step
That’s it on the Pocket ID side. Keep those two values handy:
- Client ID (e.g.,
jellyseerror whatever was generated) - Client Secret (the long random string)
Your Issuer URL is your Pocket ID domain, for example https://auth.yourdomain.com.
Step 2: Enable OIDC in Jellyseerr
Open Jellyseerr in your browser and go to Settings → Users.
Under Login Methods, you’ll see three options:
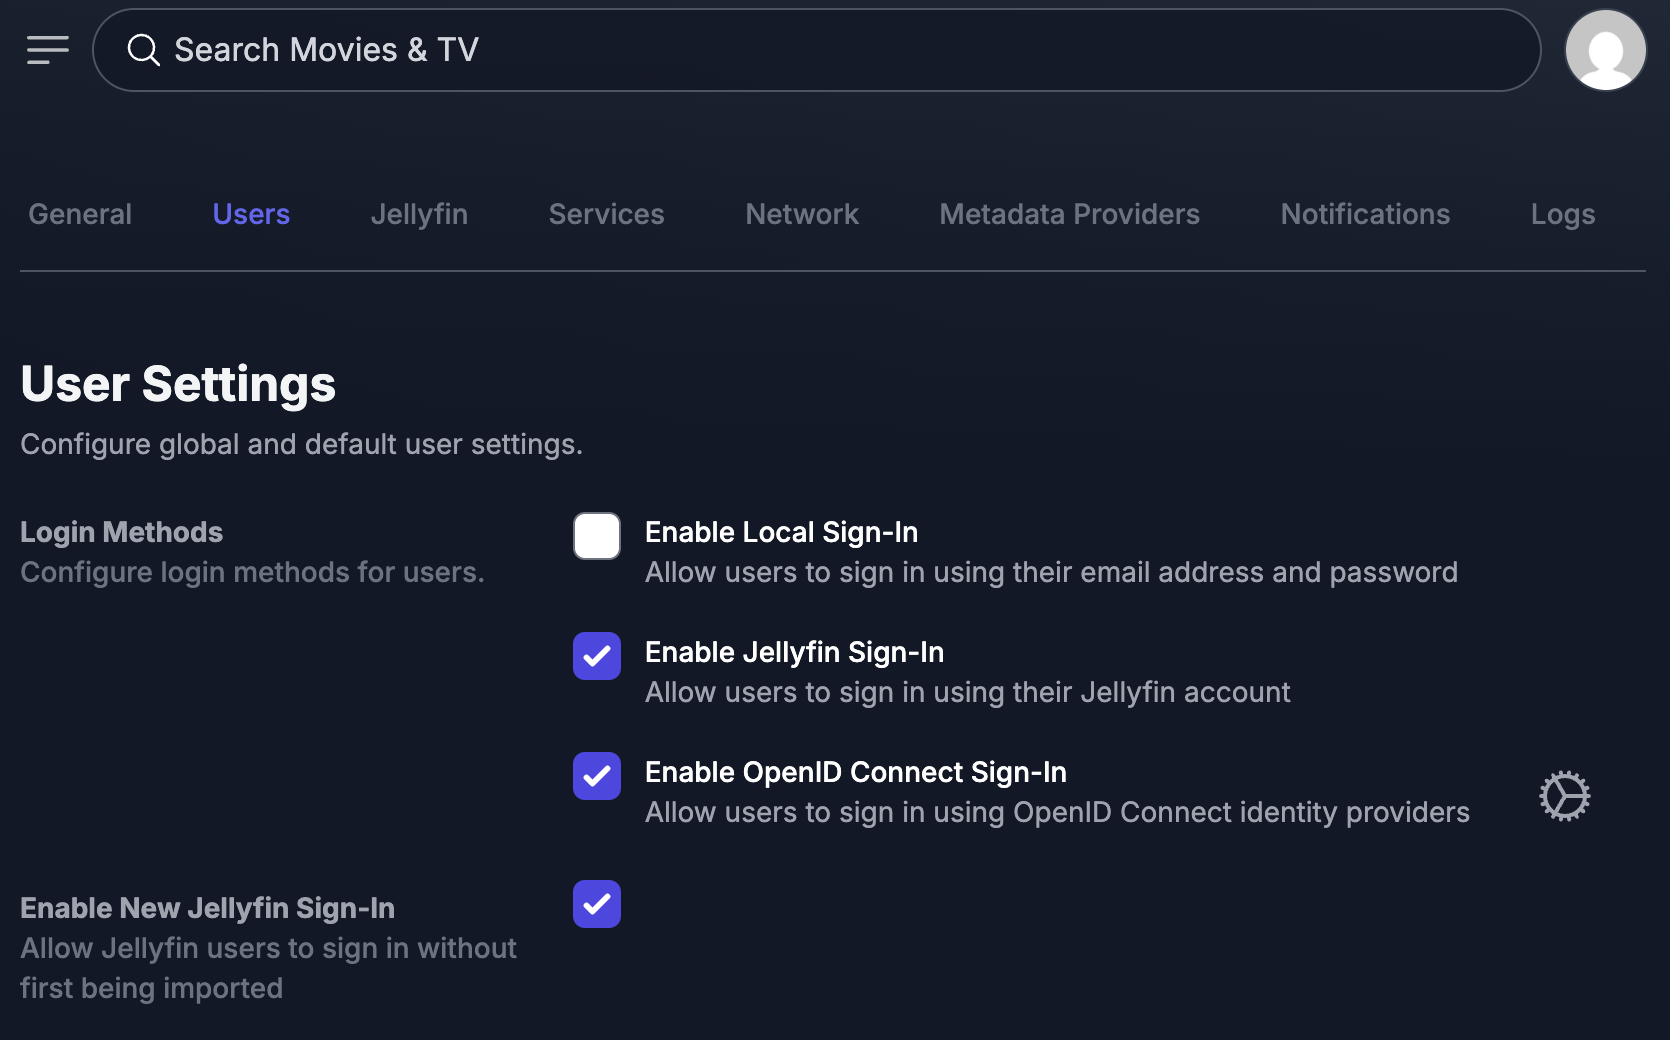
Toggle Enable OpenID Connect Sign-In on. A gear icon appears next to it, click that to open the OIDC configuration.
Step 3: Configure the OIDC provider
In the OIDC configuration dialog, fill in:
- Provider Name:
PocketID(or whatever you want the button to say on the login page) - Issuer URL:
https://auth.yourdomain.com(your Pocket ID domain, no trailing slash, no/authorizepath, just the base domain) - Client ID: the client ID you copied from Pocket ID
- Client Secret: the client secret you copied from Pocket ID
Save the settings.
Step 4: Test it
Open an incognito window and go to your Jellyseerr login page. You should see a new button for signing in with your OIDC provider (it’ll say whatever you set as the Provider Name).
Click it. You’ll get redirected to Pocket ID, log in there, and get sent back to Jellyseerr, logged in. That’s it.
Troubleshooting
“Redirect URI mismatch” error - Make sure the redirect URI in Pocket ID matches what Jellyseerr is sending. Jellyseerr uses https://your-jellyseerr-domain/api/v1/auth/oidc-callback as the callback URL. Some OIDC providers need this explicitly added as an allowed redirect URI.
“Invalid issuer” error - Double check your Issuer URL. It should be just the base domain of your Pocket ID instance (e.g., https://auth.yourdomain.com), not a path like https://auth.yourdomain.com/.well-known/openid-configuration.
Login works but user has no permissions - New OIDC users are created with default permissions. Go to Settings → Users in Jellyseerr to manage their access level.
OIDC button doesn’t appear - Make sure you saved the OIDC configuration AND toggled the “Enable OpenID Connect Sign-In” switch. Both need to be done.
Optional: Disable other login methods
Once OIDC is working, you might want to disable local sign-in and only keep Jellyfin + OIDC. This means everyone authenticates through either their Jellyfin account or your OIDC provider, so there’s no separate Jellyseerr passwords to manage.
Up to you. I keep Jellyfin sign-in enabled as a fallback, with OIDC as the primary login method.
That’s the whole setup. You now have Jellyseerr running from source with OIDC support, behind a proper domain, authenticating through Pocket ID. Your users get single sign-on across your homelab services, and you don’t have to manage another set of passwords.
Questions? Leave a comment below or get in touch.
// wanna get notified?
Drop your email and I'll let you know when I publish new guides on homelab, self-hosting, and dev stuff.